
Python
程式语言教学目标
:
教学内容
:�
Introduction: 特色与应用场合。�
Basic Types: 数值、字串、串列、辞典集 。�
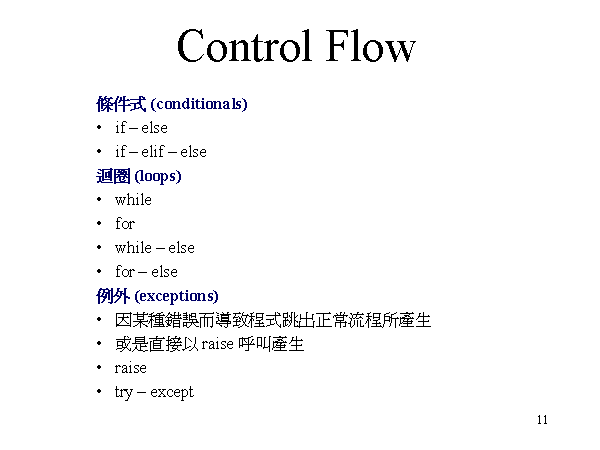
Structure: 流程控制、函式、模组。�
Useful Modules: 系统常用之模组工具。�
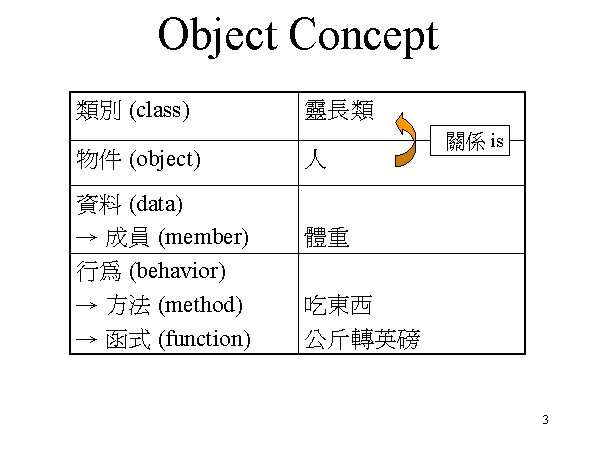
Object: 物件结构及类别库。�
Demo: Python程式范例。
A language that makes it hard to write elegant code makes it hard to write good code.
-- Eric S. Raymond

特色
延革
可参考物件导向式语言之简介,网址
http://catalog.com/softinfo/objects.html。
Zope程式人员开发手册
http://www.zope.org/Documentation/ZDG 。

通信论坛管理程式
mailman 网站 http://www.list.org/http://www.tuxedo.org/~esr/cml2/index.html
学习
Python 之相关先备知识物件观念,
shell 环境的操作,以及档案系统结构,都是重要的先备知识,另外,C 语言的基本观念与技巧,也会有助于 Python 的学习,比如说,事先看过 A Book on C (作者是 Al Kelley 与 Ira Pohl) 的内容。这些简单的先备知识,可以成为多种程式语言学习背景支撑,建议不妨抽空予以纳入。线上资源
程式语言的学习方法,其原则与日常语言极其相似。
‘应用于日常生活’及‘依样画葫芦’,应是两条学习捷径。
在生活里寻找程式语言的应用机会,能让语言学习增添动机与乐趣,模仿前人的程式范例,可省茫然摸索的时间浪费,进而积累举一反三之效。
星舰
(Starship Python) 网站里的舰员名单里,高手如云,通常他们也乐于分享自己的学习经验,不妨抽空前往取经。http://starship.python.net/crew.html安装
Python下载网址
http://downloads.activestate.com/ActivePython/windows/2.1/ActivePython-2.1.1.msi
进入交谈式环境
Linux: $ python
Windows: python (command line)
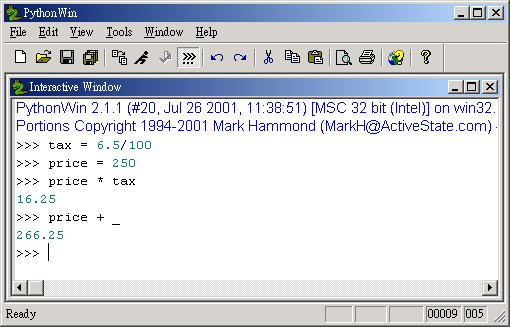
ActivePython: Python Win Environment
离开交谈式环境
送出
EOF 字元Linux: Ctrl + D
Windows: Ctrl + Z
ActivePython: File - Exit
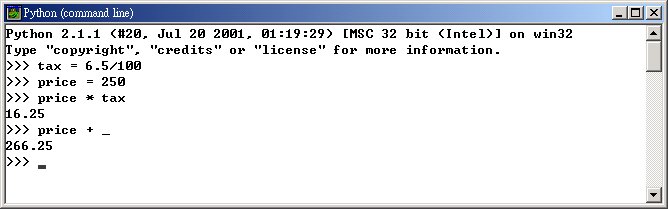
计算机功能
特别注意到上述的
_ (底线) 符号,它代表的是前一个计算值的结果。还可以呼叫一些内建函式或载入函式模组。
>>> round(3.14159, 4)
3.1416
>>> abs(-3.000000001)
3.000000001
>>> import math
>>> math.sqrt(2)
1.41421356237
基本型别

字串
(string)、串列 (list)、值组 (tuple) 属于 Python 的序数型别 (sequence)。辞典集 (dictionary) 属于 Python 的映射物件 (mapping object)。
example$ python
Python 2.2.1 (#1, Aug 30 2001, 17:36:05) [GCC 2.96 20000731 (Mandrake Linux 8.1 2.96-0.61mdk)] on linux-i386
Type "copyright", "credits" or "license" for more information.
>>> x = 5 + 14 / 7 - 3 * 2
>>> x
1
>>> 5 / 2 u
2
>>> 5.0 / 2
2.5
>>> 2 ** 8 v
256
>>> 10 ** 9
1000000000
>>> 10 ** 10 u
Traceback (innermost last):
File "<stdin>", line 1, in ?
OverflowError: integer pow()
>>> 10L ** 10 v
10000000000L
>>> x = 2147483647 w
>>> x
2147483647
>>> x + 1 x
Traceback (innermost last):
File "<stdin>", line 1, in ?
OverflowError: integer addition
>>> 7.3 ** 2.4
118.025232408
>>> 3.5e8 * 2.0e7 u
7e+15
>>> x = 1.00000000001
>>> x
1.00000000001
>>> x = 1.000000000001 v
>>> x
1.0
>>> x = (3 + 2j) * (4 + 9j) u
>>> x
(-6+35j)
>>> x.real v
-6.0
>>> x.imag v
35.0
流程控制
example$ cat print_pr.py
principal = 1000
rate = 0.05
num_years = 5
year = 1
while year <= num_years : u
principal = principal * (1 + rate)
print year, principal v
year = year + 1
v 如果有人对于输出格式不够满意的话,可以采用 print "%3d %0.4f" % (year, principal) 叙述式,则可以得到新的输出结果:
1 1050.0000
2 1102.5000
3 1157.6250
4 1215.5063
5 1276.2816
example$ cat high_low.py
number = 78
guess = 0
while guess != number :
guess = input(
“Guess a number: “)if guess > number :
elif guess < number :
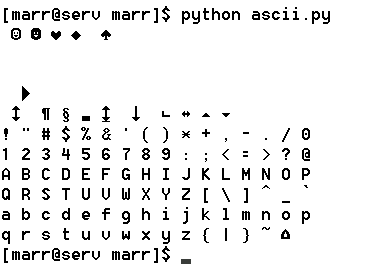
example$ cat ascii.py
#!/usr/bin/python
i = 0
while i < 128 :
print chr(i), u
if i != 0 and i % 16 == 0 : v
i = i + 1
物件型别比较

字串
(string)、串列 (list)、值组 (tuple) 属于 Python 的序数型别 (sequence)。辞典集 (dictionary) 属于 Python 的映射物件 (mapping object)。
在 Python 当中,只要将几个文字包含在单引号、双引号、三引号里,就可以建立一个字串:
>>> a = 'hello world'
>>> b = "It's nice to learn Python"
>>> c = """
... this is a triple quote demo.
... see? we can go even cross lines :)
... remember to end it with another triple quote.
... """
>>> a[0]
'h'
>>> b[5:18]
'nice to learn'
>>> c[-22:]
'another triple quote.\012'
串列 (list) 是以中括符号为设定格式,下列是其操作特性:
>>> x = [1, 2.0, 7, "eleven"]
>>> x[1]
2.0
>>> x[-2]
7
我们可以使用分割运算 (slice),来截取串列项目里的某段子集,由于这项操作技巧太实用了,建议不但要搞懂,最好还能熟练。
>>> y = ["first", "second", "third", "fourth"]
>>> y[1:-1] u
['second', 'third']
>>> y[:3] v
['first', 'second', 'third']
>>> y[-2:] w
['third', 'fourth']
>>> y[-2:-3] x
[]
以串列 y 为例,其完整的索引 (index) 设定状况分析如下:
|
y = |
[ |
"first" |
, |
"second" |
, |
"third" |
, |
"fourth" |
] |
||
|
↑ |
↑ |
↑ |
↑ |
↑ |
|||||||
|
正向索引 |
0 |
1 |
2 |
3 |
4 |
||||||
|
负向索引 |
-4 |
-3 |
-2 |
-1 |
u 原则上,分割运算是采用 [m:n] 格式,m 为起点,n 为终点,不管是利用正向索引或是负向索引皆可。搭配图示对照后,可以很轻易地看出 y[1:-1] 指的是
“second” 与 “third” 所组成的子串列,也就称为串列 y 的一个‘切片’(slice)。v 分割运算若省略‘指明的’起点,则代表从最前面的元素取起。
w 分割运算若省略‘指明的’终点,则代表取至最后面的元素为止。
x 当起点落在终点之后时,分割运算的结果会是空串列。
接着,我们介绍的是值组 (tuple) 型别,乍看之下,它与串列的运作方式类似,不同处在于值组是以小括号符号为设定格式,串列是以中括号为设定格式,而且值组是不可变的物件,串列是可变的物件。
>>> t = ("this", "is", "a", 6, "element", "tuple") u
>>> len(t) v
6
>>> max(t) w
'tuple'
>>> min(t) x
6
另外,序数型别既然包括字串、串列、值组三种,在操作应用时,三者是具有共通之运算元的,比如之前已介绍过的索引运算、分割运算,以及 len()、min()、max() 等。
物件的可变与不可变
什么是‘可变的’物件呢? 允许使用者对物件进行新增、修改、删除等动作,该物件则称为‘可变的’物件。事实上,每一种储存在 Python 程式里的资料,都是以物件的方式存在,而每一个物件的组成,则包括有识别字、资料型别,以及物件的值。当一个物件建立完毕之后,它的识别字和型别都不可以再更改,但它里面的值却有可能被修改,而可以被修改者,就是可变物件 (mutable),否则称为不可变物件 (immutable)。
>>> a = 256
>>> b = 'Python'
>>> print id(a), id(b) u
134957540 134969832
>>> a is b v
0
>>> print type(a), type(b) w
<type 'int'> <type 'string'>
u 使用内建函式 id() 可以取得物件的识别字资讯,不过,大致只能得到一长串不甚具备意义的数字,藉以了解 a 与 b ‘确实’是两个不同的物件。
v 使用 is 运算元可以直接比较两个物件的识别字是否相同,由于我们知道 a 与 b 的识别字确实不同,因此运算结果是 0。
w 使用内建函式 type() 可以取得物件的型别资讯。
>>> y = [
“first”, “second”, “third”, “fourth”]>>> id(y)
135309760
>>> y[2] = '3rd' u
>>> y.append('5th') v
>>> y
['first', 'second', '3rd', 'fourth', '5th']
>>> id(y) x
135309760
>>> y.sort() w
>>> y
['3rd', '5th', 'first', 'fourth', 'second']
>>> id(y) x
135309760
u 以索引运算来指定想要变更的资料值。
v 以物件方法 append() 来增加 '5th' 字串到串列 y 的最后面。
w 以物件方法 sort() 来将串列元素排序。
x 特别注意到,经过上述的操作及修改过程,串列 y 的识别字仍维持相同,表示串列 y 是可变物件。
连续数值的指定
: 内建函式 range()range 是一个便利的内建函式,可以传回一组整数值的串列。
>>> range(7) Œ
[0, 1, 2, 3, 4, 5, 6]
>>> (mon, tue, wed, thu, fri, sat, sun) = range(7)
>>> mon
0
>>> sun
6
>>> range(-5, 5) Ž
[-5, -4, -3, -2, -1, 0, 1, 2, 3, 4]
>>> range(0, 10, 3)
[0, 3, 6, 9]
下列的简单范例,可以将一组资料进行编号。
>>> weekday = ('mon', 'tue', 'wed', 'thu', 'fri', 'sat', 'sun')
>>> for day in range(len(weekday)):
... print day, weekday[day]
...
0 mon
1 tue
2 wed
3 thu
4 fri
5 sat
6 sun
实务程式写作上,
range函式 与 for 回圈经常搭配。还记得之前的 ascii.py 范例吗? 我们可以使用 for 回圈与 range 函式加以改写,来个温故知新。example$ cat ascii.py
#!/usr/bin/python
for i in range(128) :
print chr(i),
if i != 0 and i % 16 == 0 :
相较之下,程式码本身显得简化了,但语法型态与
while 不同,读者应用时大抵挑自己习惯者即可。
语法结构
Python 识别字指定规则:
http://www.python.org/doc/2.1/ref/identifiers.html
Python 所有保留字资讯:
http://www.python.org/doc/2.1/ref/keywords.html
函式指定方式
以保留字
def 为首,并依照缩排规则撰写内容。惯例上,函式的第二行会是一段‘三引号注释字串’。
文件字串
(documentation string)""" 所括夹的文字,称为‘文件字串’。
可以透过如 fact.__doc___ 物件方法,来显示文件字串内容。
>>> def fact(n):
... """Return the factorial of the given number."""
... r = 1
... while n > 0:
... r = r * n
... n = n - 1
... return r
...
>>> fact.__doc__
'Return the factorial of the given number.'
>>> fact(5)
120
>>>
fact() 是一个阶乘函式范例,请注意到最后一行的保留字 return,如果少了 return 叙述,则预设会以 None 值传回。以范例函式 fact() 来看,n 是函式的参数 (argument),其传回值 r 是 n 的阶乘结果。
>>> def fact(n=10):
... """Return the factorial of the given number, with the defult input value."""
... r = 1
... while n > 0:
... r = r * n
... n = n - 1
... return r
...
>>> fact(5)
120
>>> fact()
3628800
>>>
上述程式片段示范了函式预设输入值的设定方式,试试以
fact(5) 呼叫范例函式,会得到传回值 120,而以 fact() 呼叫,则会传回以 10 为预设输入值的 3628800。>>> def power(x, y=2):
... r = 1
... while y > 0:
... r = r * x
... y = y - 1
... return r
...
>>> power(2, 4)
16
>>> power(3)
9
>>> power()
Traceback (innermost list):
File "<stdin>", line 1, in ?
TypeError: not enough arguments: expected 1, got 0
>>> power(2, 4, 3)
Traceback (innermost list):
File "<stdin>", line 1, in ?
TypeError: too many arguments: expected 2, got 3
>>>
一个函式可以设定多个输入值,上例
power() 函式可以接受两个输入值,但至少需要 (expect) 一个输入值,因为参数 y 有个预设值 2,输入参数时可以省略之。以 power(2, 4) 呼叫时,会成功传回 16,以 power(3) 呼叫时,会自动以 power(3, 2) 为输入值,传回 9。如果以 power() 呼叫,则会产生 TypeError 的错误讯息,它会明确告知‘参数不足’,你必须至少输入几个参数,如果是以 power(2, 4, 3) 来呼叫,则会得到‘参数过多’的 TypeError 讯息。>>> power(y=4, x=2)
16
>>>
另一个有用的应用技巧,称为‘关键字派定法’
(keyword passing),是以类似 power(x=2, y=4) 方式来呼叫,明确地将参数值配合变数名称通知函式,甚至也可以用 power(y=4, x=2) 方式来呼叫,如此一来,两者的呼叫结果是完全相同,意即其参数值顺序可以任意改变。我们接着来看一些任意个输入值的例子,相信其实用价值极高。
>>> def maximum(*numbers):
... if len(numbers) == 0:
... return(None)
... else:
... max = numbers[0]
... for n in numbers[1:]:
... if n > max:
... max = n
... return max
...
>>> maximum(3, 8, 5)
8
>>> maximum(2, -5, 9, 1, 7)
9
函式
maximum() 的用意很明显,我们可以输入任意个数的数值,而它最后会传回最大值。例如 maximum(3, 8, 5) 会传回 8,而 maximum(2, -5, 9, 1, 7) 会传回 9。值得注意的地方,就是其处理不定参数个数的技巧,参数指定以 *numbers 方式代表,而 numbers 本身是一个值组 (即 tuple,而非 list)。下列的例子,将参数设定的可能状况大抵做了整合介绍,我们可以一窥函式参数派定的相关细节,值得读者反覆测试观察。
>>> def args_func(a, b, c=9, *other1, **other2): Œ
... return [a, b, c, other1, other2.items()]
...
>>> args_func(1, 2, 3) Ž
[1, 2, 3, (), []]
>>> args_func(b=1, a=2)
[2, 1, 9, (), []]
>>> args_func(1, 2, 3, 4, 5, 6, 7, 8, 9)
[1, 2, 3, (4, 5, 6, 7, 8, 9), []]
>>> args_func(1, c=3, b=2, d=4, e=5) ‘
[1, 2, 3, (), [('d', 4), ('e', 5)]]
>>> args_func(d=4, e=5)
Traceback (innermost last):
File "<stdin>", line 1, in ?
TypeError: not enough arguments; expected 2, got 0
Œ
范例函式 args_func() 可以输入三个 (以上的) 参数,参数名称分别是 a、b、c,其中 c 有预设值为 9,a 与 b 是必要的输入参数。而 *other1 用以指定 a、b、c 关键字之外的参数值 (不定个数),**other2 则是用以指定 a、b、c 关键字之外的派定值 (同样是不定个数)。
函式 args_func() 非常简洁,直接把所有的输入参数值以串列资料型别传回。其中的 other1 属于值组资料型别,而 other2 则是辞典集 (dictionary) 资料型别。别慌,稍后会为读者解说辞典集的相关细节。Ž
给定三个参数值,它们会分别成为函式 args_func() 的 a、b、c 的设定值,此时 other1 与 other2 都是空空如也。
使用关键字派定法来指定 a 与 b 的参数值,而使用 c 的预设参数值。
给定了九个参数值,前三个依序成为 a、b、c 的参数值,后六个数值则成为值组 other1 的元素内容。‘
给定了五个参数值,第一个成为 a 的参数值,b 与 c 以关键字派定法来指定,而最后的 d 与 e 则成为不定个数的关键字派定值,它们被辞典集 other2 所收留了。内建资料型别
dictionary 的使用辞典集是
Python 里的内建映射物件 (mapping object),也就是由一个物件集合来作为另一个物件集合的键值索引。映射物件和之前谈过的序数资料相较,在概念上有扩充、补强的涵意,善用映射物件的特性,可以协助我们将看似复杂的问题,以相当直觉的方式解决。两者具有若干不同之处,例如序数以索引运算作为其取值方式,映射物件的元素成份来源很有弹性,映射物件是不做排序的,而且映射物件是可变物件。在功能上,辞典集的实作相当于资料结构里的杂凑表
(hash table) 或是相关阵列 (associative array),所以你会看到‘键-值’(key-value pairs)的表示法。通常我们会以字串来做为辞典集的 key,因为有意义的字串可以带来‘望文生义’的效果,不过,一定要以不可变物件来做辞典集的 key,而 value 的部份就全无限制了。>>> x = [] Œ
>>> y = {} Œ
>>> x[0] = 'Beatles' Œ
Traceback (innermost last):
File "<stdin>", line 1, in ?
IndexError: list assignment index out of range
>>> y[0] = 'John Lennon'
>>> y[1] = 'Paul McCartney'
>>> y[2] = 'George Harrison'
>>> y[3] = 'Ringo Starr'
>>> y[0] + " and Yoko Ono" Ž
'John Lennon and Yoko Ono'
>>> y
{3: 'Ringo Starr', 2: 'George Harrison', 1: 'Paul McCartney', 0: 'John Lennon'}
>>> y.keys()
[3, 2, 1, 0]
>>> y.values()
['Ringo Starr', 'George Harrison', 'Paul McCartney', 'John Lennon']
>>> y.items()
[(3, 'Ringo Starr'), (2, 'George Harrison'), (1, 'Paul McCartney'), (0, 'John Lennon')]
>>>
注意到辞典集的储存,并没有特定的顺序方式,如果想要依特定的排序方法处理资料,可以另寻变通方法。>>> Beatles = {'leader':'John','bass':'Paul','guitar':'George','drum':'Pete'} Œ
>>> Hurricanes = {'drum':'Ringo'}
>>> Beatles.update(Hurricanes) Ž
>>> Beatles
{'drum': 'Ringo', 'leader': 'John', 'bass': 'Paul', 'guitar': 'George'}
>>> Beatles.get('leader', "Not available")
'John'
>>> Beatles.get('manager', "Not available")
'Not available'
>>>
Ž
透过 update() 物件方法,我们更新了 Beatles 鼓手的设定资料。
get() 物件方法是询问 Beatles 里是否有 leader 此一键值,若存在则传回其对应之元素值,否则会传回后头的字串资料。表
: 辞典集的方法和操作|
项目 |
说明 |
|
len(dict) |
传回辞典集 dict 里的元素个数。 |
|
dict[k] |
传回键值 k 的元素内容。 |
|
dict[k]=v |
将 dict[k] 的内容设定为 v。 |
|
del dict[k] |
将 dict[k] 元素项目移除。 |
|
dict.clear() |
将辞典集 dict 所有元素项目全部移除。 |
|
dict.copy() |
将辞典集 dict 整个复制。 |
|
dict.has_key[k] |
如果辞典集 dict 含有键值 k 的话,则传回 1,否则传回 0。 |
|
dict.items() |
以值组 (key, value) 的串列型别传回辞典集中所有元素。 |
|
dict.keys() |
传回辞典集 dict 的所有键值。 |
|
dict.values() |
传回辞典集 dict 的所有元素值。 |
|
dict.update(other) |
将辞典集 other 所有物件更新至辞典集 dict 当中。 |
|
dict.get(k [, other]) |
如果 dict[k] 存在则传回 dict[k],否则传回 other。 |
模组的使用
以
Linux Mandrake 8.1 为例,其安装目录为 /usr/lib/python2.1。目录里包含类似 string.py、os.py、find.py 的档案,我们可以透过 import string, os, find 之类的程式语法呼叫这些模组内容。也可以直接阅读这些 .py 档案的程式码,相信部份档案的内容,对你而言已不再全是天书。实际动手撰写自己的模组之前,我们得先认识内建函式
dir() 的功能,它可以将许多物件内部的资讯显示出来。>>> dir() Œ
['__builtins__', '__doc__', '__name__']
>>> dir(__doc__)
[]
>>> print __doc__
None
>>> print __name__ Ž
__main__
>>> type(__builtins__)
<type 'module'>
>>> dir(__builtins__)
['ArithmeticError', 'AssertionError', 'AttributeError', 'EOFError', 'Ellipsis', 'EnvironmentError', 'Exception', 'FloatingPointError', 'IOError', 'ImportError', 'IndexError', 'KeyError', 'KeyboardInterrupt', 'LookupError', 'MemoryError', 'NameError', 'None', 'NotImplementedError', 'OSError', 'OverflowError', 'RuntimeError', 'StandardError', 'SyntaxError', 'SystemError', 'SystemExit', 'TypeError', 'ValueError', 'ZeroDivisionError', '_', '__debug__', '__doc__', '__import__', '__name__', 'abs', 'apply', 'buffer', 'callable', 'chr', 'cmp', 'coerce', 'compile', 'complex', 'delattr', 'dir', 'divmod', 'eval', 'execfile', 'exit', 'filter', 'float', 'getattr', 'globals', 'hasattr', 'hash', 'hex', 'id', 'input', 'int', 'intern', 'isinstance', 'issubclass', 'len', 'list', 'locals', 'long', 'map', 'max', 'min', 'oct', 'open', 'ord', 'pow', 'quit', 'range', 'raw_input', 'reduce', 'reload', 'repr', 'round', 'setattr', 'slice', 'str', 'tuple', 'type', 'vars', 'xrange']
>>> print __builtins__.__doc__
Built-in functions, exceptions, and other objects.
Noteworthy: None is the `nil' object; Ellipsis represents `...' in slices.
>>>
Œ
当我们身处新启动之 Python 交谈环境里,输入 dir() 可以显示 local symbol table的名称串列,共计三个。
进一步提供 __doc__ 给 dir() 做为参数,传回空串列,表示 __doc__ 物件已无相关属性 (attributes)。print __doc__ 显示其为 None 物件。Ž
__name__ 是一个字串物件,表示目前执行‘程式’的名称,其值为 __main__。
__builtins__ 则是一个模组物件,持续以 dir(__builtins__) 观察,可以显示模组 __builtins__ 的全部属性。
显示 __builtins__ 的 __doc__ 属性内容。注意到,每个正在执行的主要程式,其程式名称
(即 __name__ 属性) 会是 __main__,如果是以模组型态被 import 进来,那么该模组程式便会以原本档案名称为 __name__ 的值。请观察下列程式范例的说明,两个极其简化的‘土制模组’。example$ cat other_mod.py
#!/usr/bin/python
print "this is from other_mod."
print __name__
example$ chmod 755 other_mod.py; ./other_mod.py
this is from other_mod.
__main__
example$ cat my_mod.py
#!/usr/bin/python
"""Simple module example for illustrating how __*__ works."""
import other_mod
print "this is from my_mod."
print __name__
example$ chmod 755 my_mod.py; ./my_mod.py
this is from other_mod.
other_mod
this is from my_mod.
__main__
被
import 的模组档案,其内容会被执行,所以范例 my_mod.py 在执行之后,会先读进 other_mod.py 的程式片段,接着才是 my_mod.py 的程式片段。请特别留意 __name__ 属性值的变化,这项控制技巧经常被使用。Python 实际搜寻模组路径的设定值,可以由 sys 模组里的 path 变数值取得。
>>> import sys
>>> sys.path
['', '/usr/lib/python1.5/', '/usr/lib/python1.5/plat-linux-i386', '/usr/lib/python1.5/lib-tk', '/usr/lib/python1.5/lib-dynload', '/usr/lib/python1.5/site-packages', '/usr/lib/python1.5/site-packages/PIL']
>>> import marr
Traceback (innermost last):
File "<stdin>", line 1, in ?
ImportError: No module named marr
>>>
以载入
foo 模组为例,其实际寻找模组的过程顺序如下:1. 是否存在名为 foo 的目录,并且里头含有该模组的档案。
2. 是否存在 foo.so、foomodule.so、foomodule.sl 或是 foomodule.dll
3. 是否存在 foo.pyo
4. 是否存在 foo.pyc
5. 是否存在 foo.py
以一个
.py 的 Python 原始码档案而言,经过编译后,会产生一个名为 .pyc 的 bytecode执行档,当寻找某个模组名称时,要是 .py 档案的日期不比 .pyc 档案来得新,Python 直译器会直接将编译好的 .pyc 档案载入,若是 .py 档案的日期比 .pyc 档案来得新,通常就表示 .py 档案内容已更新,Python 直译器会重新编译之,以产生新的 .pyc 档案,然后才进入载入动作。而 .pyo 档案只有在直译器以 -O 选项启动之后才会产生,这类档案里的资讯通常比 .pyc 档案来得多,包含有原始程式的行号以及除错资讯,因此 .pyo 档案的载入速度会较慢,但程式的执行速度会较快。而
.pyc 或是 .pyo 档案的编译动作,是在程式里头呼叫 import 后才会发生,对 Python语言来说,模组档案不止是设计概念的切割,它更从强化模组执行效率的角度,鼓励程式员善用模组档案功能。如果自制的模组档案越来越多,其应用自然越显重要,此时便要认真为自制模组找个适当的存放路径,比较常见的方式之一,是设定相关的环境变数值,例如变数 PYTHONPATH。表
: Python 相关环境变数设定|
变数名称 |
说明 |
|
PYTHONDEBUG |
与 python -d 启动模式相同。可产生 Python 的语法解析除错资讯。 |
|
PYTHONHOME |
与模组搜寻路径设定相关的变数。 |
|
PYTHONINSPECT |
与 python -i 启动模式相同。以交谈模式来执行 Python 程式。 |
|
PYTHONOPTIMIZE |
与 python -O 启动模式相同。以最佳化模执行 Python 程式。 |
|
PYTHONPATH |
增加模组搜寻路径。 |
|
PYTHONSTARTUP |
交谈模式就绪前所执行的程式路径。 |
|
PYTHONUNBUFFERED |
与 python -u 启动模式相同。记录未做缓冲的二元标准输出输入。 |
|
PYTHONVERBOSE |
与 python -v 启动模式相同。执行过程详列相关处理资讯。 |
请将现行目录设定在
my_mod.py 档案存放的目录,然后进入 Python 的交谈环境。example$ python
Python 1.5.2 (#1, Sep 30 2000, 18:08:36) [GCC 2.95.3 19991030 (prerelease)] on linux-i386
Copyright 1991-1995 Stichting Mathematisch Centrum, Amsterdam
>>> dir()
['__builtins__', '__doc__', '__name__']
>>> import my_mod
this is from other_mod.
other_mod
this is from my_mod file.
my_mod
>>> dir()
['__builtins__', '__doc__', '__name__', 'my_mod']
>>> dir(my_mod)
['__builtins__', '__doc__', '__file__', '__name__']
>>> print my_mod.__doc__
Simple module example for illustrating how __*__ works.
>>> print my_mod.__file__
my_mod.py
>>>
除了基本的资料型别之外,
Python 里的每一个模组物件都拥有自己的名称空间。下列是一个范例程式,可以协助列出模组物件的名称资讯。example$ cat namespace.py
#!/usr/bin/python
import sys
k = sys.modules.keys()
print "Keys:", k
print "-" * 30
for i in k:
if i == "__main__":
print ">>>", i, "__dict__", sys.modules[i].__dict__
print "-" * 30
print dir()
在实务设计上,
Python 程式员会运用模组的方式,将物件做适当的切割,切割好的程式可以被包在一个 Python 类别库 (package) 里,以便进一步有效管理大型的软体专案。有了函式、模组、类别库等一系列的架构,我们便可更直觉地管理软体专案的物件体系。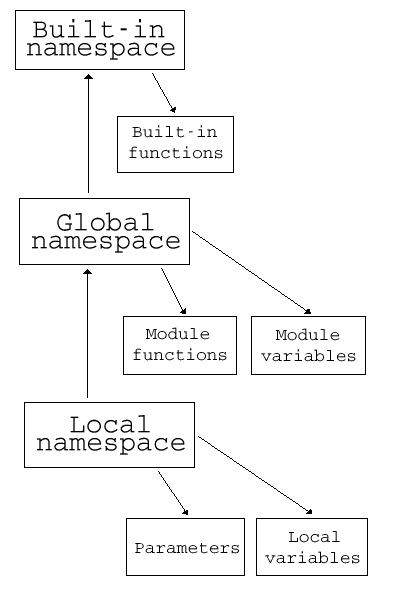
图
: 名称空间阶层示意其他有用的函式
为了方便接续的内容,我们先来认识一个实用的模组,称为
string,顾名思义,可用于协助处理字串物件。>>> import string
>>> date = "Fri May 18 CST 2001"
>>> piece1 = string.split(date)
>>> piece1
['Fri', 'May', '18', 'CST', '2001']
>>> time = "12:03:27"
>>> piece2 = string.split(time, ':')
>>> piece2
['12', '03', '27']
>>> string.digits
'0123456789'
上述范例,让我们见识到模组
string 里有个 split() 的物件方法,可以将一个字串变数值,依空白字元 (预设状况) 为切割点,分解成数个小字串,形成一个字串串列传回。如果切割条件不是空白字元时,在 split() 所接参数中予以指定,如 split(time, ':') 就是指定要以 ':' 字元为切割点。最后则是显示模组 string 有个字串变数 digits,内容设定为 '0123456789'。如果我们想把上述字串串列里的‘数字’,如
'18' 与 '2001',由字串型别转换成数值型别,可以怎么做呢? 下列是个方法。>>> def try_ai(s):
... if s[0] in string.digits:
... return string.atoi(s)
... else:
... return s
...
>>> import string
>>> date = "Fri May 18 CST 2001"
>>> piece = string.split(date)
>>> finish_ai = map(try_ai, piece)
>>> print finish_ai
['Fri', 'May', 18, 'CST', 2001]
>>>
首先,定义一个叫做
try_ai() 的函式,它在读进字串后,会比对字串的第一个字元,如果第一个字元是属于阿拉伯数字,那么就会尝试将字串转换成整数,最后传回其整数型别资料。是的,你会发现它的演算规则有些天真,不过,我们暂时还不需要一个无懈可击的转换函式。接着,我们载入模组
string 之后,利用内建函式 map() 将自制函式 try_ai 与字串串列 piece 连结起来,如此一来,便能如愿将 piece 里的部份字串,转换成数值型别。显然 map() 函式在此例中帮上大忙,简洁地协助我们将自制函式与序列资料做了巧妙结合。接下来,我们就可以进一步稍微改良原本天真的
try_ai() 函式。>>> def try_ai(s):
... if ':' in s:
... ts = string.split(s, ':')
... return map(string.atoi,ts)
... if s[0] in string.digits:
... return string.atoi(s)
... else:
... return s
...
>>> import string
>>> date = "Fri May 18 12:03:27 CST 2001"
>>> piece = string.split(date)
>>> finish_ai = map(try_ai, piece)
>>> print finish_ai
['Fri', 'May', 18, [12, 3, 27], 'CST', 2001]
>>>
>>> piece = ['Fri', 'May', '18', '12:03:24', 'CST', '2001']
>>> def strp(x, y):
... return x + ' ' + y
...
>>> r = reduce(strp, piece)
>>> r
'Fri May 18 12:03:24 CST 2001'
>>>
上述程式片段,处理效果刚好与之前的程式相反,它会把字串串列重组成一个长字串。重点就是利用了内建函式
reduce(),其运作方式同样要输入一个函式名称及一个序数资料,不过,目的是要把序数资料的元素‘合并减少’成一个。reduce() 也可以应用在数值串列上,以下便是这样的范例。>>> n = range(1, 11)
>>> def mult(x, y):
... return x * y
...
>>> f = reduce(mult, n)
>>> f
3628800
>>>
说穿了,它还是一个阶乘的范例,每呼叫一次
mult() 函式,数值串列的个数会越来越少,最后传回一个阶乘结果,在此例中,即 10! 的答案。下列是一个简化版本的闰年判断程式,我们将介绍另一个函式
filter()。>>> def leap(y):
... if (y%400) == 0:
... return 1
... elif (y%100) == 0:
... return 0
... elif (y%4) == 0:
... return 1
... return 0
...
>>> n = range(1900, 2001)
>>> leap_year = filter(leap, n)
>>> leap_year
[1904, 1908, 1912, 1916, 1920, 1924, 1928, 1932, 1936, 1940, 1944, 1948, 1952, 1956, 1960, 1964, 1968, 1972, 1976, 1980, 1984, 1988, 1992, 1996, 2000]
函式
filter() 同样是接一个函式名称与一个序数资料为参数,重点在于,在自制函式中,你必须把‘想留下来的资料’,其函式传回值设为 1 (代表 true),而把‘不想留下来的资料’,其函式传回值设为 0 (代表 false)。如此一来,filter() 函式在依序处理完序数资料后,还是会传回一个序数资料,而且应该只留下你想要的资料。lambda
表示式lambda 表示式是个实用而重要的工具,其功能及本质还是函式,差别在于 lambda 没有‘明确的函式名称’,而且通常只用于简洁的函式叙述。
>>> n = range(1, 11)
>>> f = reduce(lambda x, y: x * y, n)
>>> f
3628800
>>>
又是熟悉的阶乘函式,有趣的是,它的表示方式非常简洁,乍看之下,初学者可能以为是天书了。
lambda 表示式的语法如下:lambda 参数串列: 表示式
例如 x + y、x * y、s[9] 都是表示式的例子。早期,lambda 表示式的概念是取自 Lisp 语言,使用上有其便利及优势,不过,对初学者而言,使用 lambda 表示式通常还是得花时间熟悉,若是‘画虎不成反类犬’,搞到程式大乱就得不偿失了。
存取档案系统资讯
>>> import os Œ
>>> os.getcwd()
'/home/marr'
>>> os.listdir(os.curdir) Ž
['.bash_history', '.bash_logout', '.bash_profile', '.bashrc', '.muttrc', 'signature', '.ssh', '.viminfo', '.vimrc']
>>> os.chdir('/tmp')
>>> os.path.join('usr', 'local', 'bin')
'usr/local/bin'
>>> mount_point = '/mnt/cdrom'
>>> rpm_dir = 'Mandrake/RPMS'
>>> complete_dir = os.path.join(mount_point, rpm_dir)
>>> print complete_dir
'/mnt/cdrom/Mandrake/RPMS'
>>> os.path.split(complete_dir) ‘
('/mnt/cdrom/Mandrake', 'RPMS')
>>> os.path.basename(os.path.join(complete_dir, 'some.rpm')) ’
'some.rpm'
>>> os.path.dirname(os.path.join(complete_dir, 'some.rpm')) ’
'/mnt/cdrom/Mandrake/RPMS'
系统档案处理的必备工具
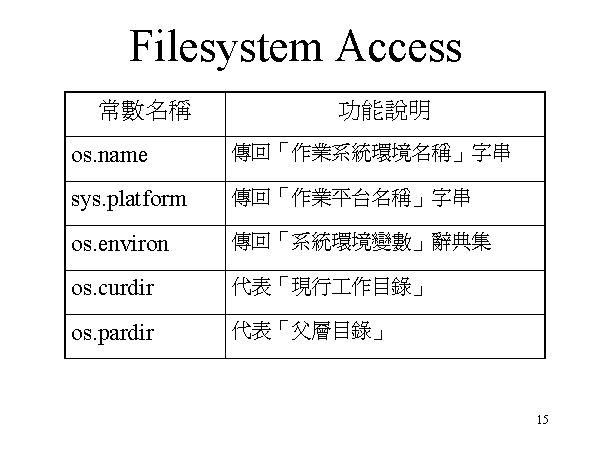
下列的常数与系统环境有关,使用上无须输入值。
|
常数名称 |
功能说明 |
传回值范例 |
|
os.name |
传回‘作业系统环境名称’字串 |
'nt', 'posix' |
|
sys.platform |
传回‘作业平台名称’字串 |
'win32', 'linux-i386' |
|
os.environ |
传回‘系统环境变数’辞典集 |
{ 'HOME': '/home/marr', 'SHELL': '/bin/bash'} |
|
os.curdir |
代表‘现行工作目录’ |
'.' |
|
os.pardir |
代表‘父层目录’ |
'..' |
既然
os.environ 传回的是辞典集,我们还可以透过 os.environ["PATH"] 方式来取出特定的环境变数值。另外像 sys.argv 是经常被利用到的变数,可以参考下列的例子:example$ cat prn_argv.py
#!/usr/bin/python
import sys
if len(sys.argv) < 2:
print "enter some arguments with this script."
sys.exit(0)
else:
print "there are %d arguments: " % (len(sys.argv),)
for n in range(len(sys.argv)):
print sys.argv[n],
example$ ./prn_argv.py
enter some arguments with this script.
example$ ./prn_argv.py argu1 argu2 argu3
there are 4 arguments:
./prn_argv.py argu1 argu2 argu3
下列的函式与档案资讯有关,使用上必须输入字串变数
(通常就是档案名称)。|
函式名称 |
函式功能 |
操作范例 |
|
os.path.exists() |
测试字串变数是否存在。 |
os.path.exists('/etc/passwd') |
|
os.path.isdir() |
测试字串变数是否为目录。 |
os.path.isdir('/etc') |
|
os.path.isfile() |
测试字串变数是否为档案。 |
os.path.isfile('/etc/X11/X') |
|
os.path.islink() |
测试字串变数是否为连结档案。 |
os.path.islink('/etc/X11/X') |
|
os.path.samefile() |
测试两个字串变数是否指向同一档案。 |
os.path.samefile('/bin/sh', '/bin/bash') |
|
os.path.isabs() |
测试字串变数是否为绝对路径。 |
os.path.isabs('/home/marr') |
|
os.path.getsize() |
传回字串变数之档案大小。 |
os.path.getsize('/etc/passwd') |
|
os.path.getatime() |
传回字串变数之最后存取时间。 |
os.path.getatime('/etc/passwd') |
|
os.path.getmtime() |
传回字串变数之最后修改时间。 |
os.path.getmtime('/etc/passwd') |
下列的函式与档案处理有关,使用上必须输入字串变数
(通常包含档案名称)。|
函式名称 |
函式功能 |
操作范例 |
|
os.mkdir() |
以指定模式建立一个新目录。 |
os.mkdir("/tmp/beatles", 0700) |
|
os.rmdir() |
删除指定目录。 |
os.rmdir("/tmp/beatles") |
|
os.rename() |
将档案或目录名称更改。 |
os.rename("/tmp/beatles", "/tmp/smiths") |
|
os.link() |
为档案建立一个连结。 |
os.link("/tmp/old_file", "/tmp/ln_file") |
|
os.symlink() |
为档案建立一个符号连结。 |
os.symlink("/tmp/old_file", "/tmp/sln_file") |
|
os.unlink() |
删除档案的连结。 |
os.unlink("/tmp/sln_file") |
|
os.stat() |
取得档案完整相关资讯。 |
os.stat("/etc/X11/X") |
|
os.lstat() |
与 stat() 相同,但不传回连结的档案。 |
os.lstat("/etc/X11/X") |
物件的使用
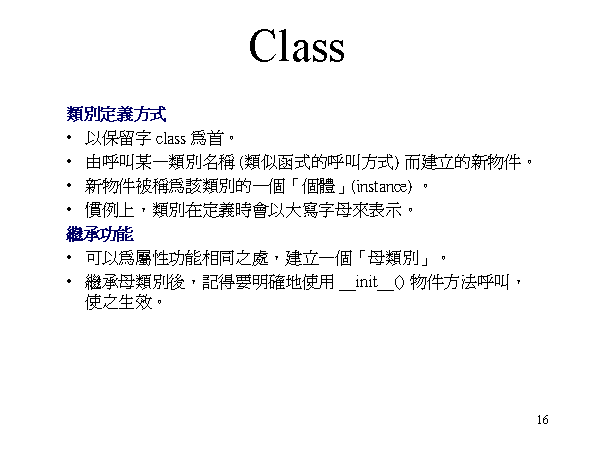
class Circle: Œ
pass Œ
myCircle = Circle()
myCircle.radius = 5 Ž
print 2 * 3.14 * myCircle.radius
Œ
定义一个 Circle 类别,其内容‘空空如也’。
建立一个新个体,名为 myCircle。Ž
设定 myCircle 的 radius 值为 5。其设定方式,是在个体物件名称后加上 . 符号,成为 myCircle.radius 这样的描述方式。个体物件的设定值,可由
__init__ 这个起始函式自动完成,通常 __init__ 又被称为类别的‘建构子’(constructor)。每次有新的个体物件被建立,都会找寻 __init__ 的设定内容,自动完成新个体物件的起始设定值。
class Circle: Œ
def __init__(self): Œ
self.radius = 1 Œ
def area(self):
return self.radius * self.radius * 3.14159
myCircle = Circle()
print 2 * 3.14 * myCircle.radius
myCircle.radius = 5 Ž
print 2 * 3.14 * myCircle.radius Ž
print myCircle.area()
Œ
类别 Circle 里有个 __init__() 函式,设定其 radius 值为 1。注意到 self 这个参数,惯例上它就是 __init__() 函式的第一个参数,当 __init__ 起始设定时,self 就会被设定为新建立的个体上。
新个体物件建立后,有自己的个体变数 (instance variables),如 radius 即为一例。Ž
个体变数的值可以重新设定。
可以为个体物件设定物件方法 (method),其方式就像定义函式一般。class Circle:
def __init__(self, r=1):
self.radius = r
def area(self):
return self.radius * self.radius * 3.14159
c = Circle(5)
print c.area()
上述则是另一个改进版本的
Circle 类别内容设定,增加预设变数 r,并指定其预设值为 1。如此一来,我们便可透过 Circle(5) 这样的方式来指定新个体的建立。
物件继承
(inheritance) 范例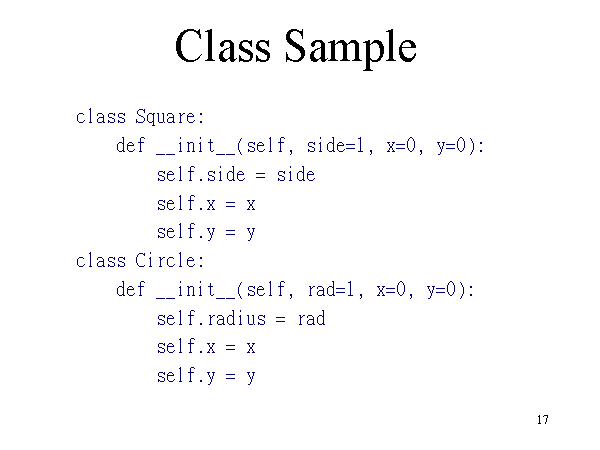
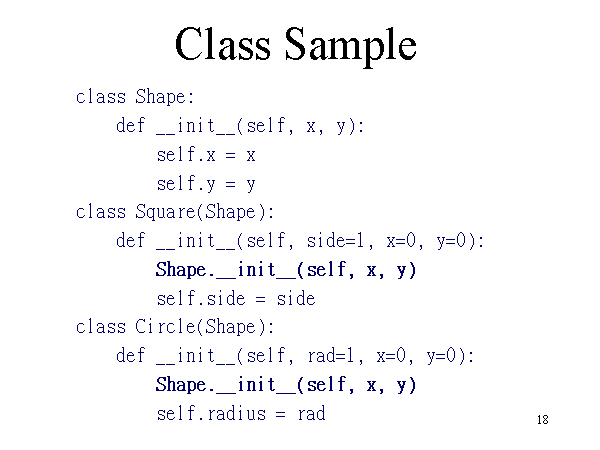
类别库
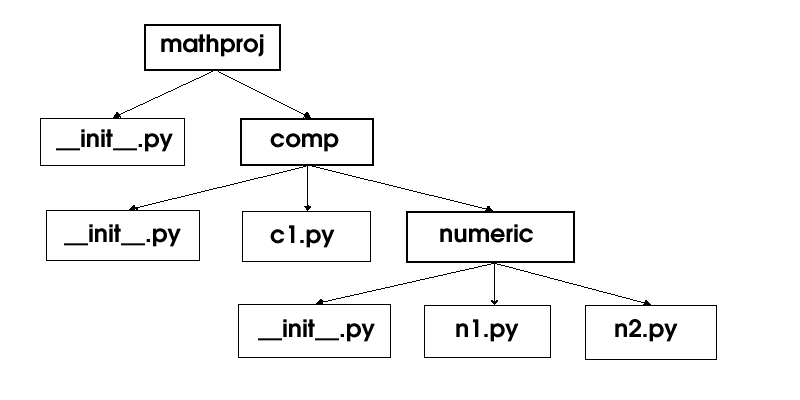
一旦模组
(module) 的运作模式熟悉了,则类别库 (package) 便不难理解,因为类别库只是在一个目录之下,将一堆功能相近而能相互引用的程式码档案收集在一起。而呼叫类别库时,则是以其上层目录名称来命名。example$ cat mathproj/__init__.py
print "Hello from mathproj init"
__all__ = ['comp']
version = 1.03
example$ cat mathproj/comp/__init__.py
__all__ = ['c1']
print "Hello from mathproj.comp init"
example$ cat mathproj/comp/c1.py
x = 1.00
example$ cat mathproj/comp/numeric/__init__.py
print "Hello from nemeric init"
example$ cat mathproj/comp/numeric/n1.py
from mathproj import version
from mathproj.comp import c1
from n2 import h
def g():
print "version is", version
print h()
example$ cat mathproj/comp/numeric/n2.py
def h():
print "Called function h in module n2"
执行来测试上述的类别库程式内容时,必须确认
mathproj 目录位于 Python 的搜寻路径中,最简单的方式,便是使用者的现行目录设定在 mathproj 目录之上,然后再开始一个 Python 的对话环境。>>> import mathproj
Hello from mathproj init
>>> mathproj.version
1.03
>>> mathproj.comp.numeric.n1 Œ
Traceback (innermost last):
File "<stdin>", line 1, in ?
AttributeError: comp
>>> import mathproj.comp.numeric.n1
Hello from mathproj.comp init
Hello from nemeric init
>>> mathproj.comp.numeric.n1.g()
version is 1.03
Called function h in module n2
None
产生密码档内容
http://aspn.activestate.com/ASPN/Cookbook/Python/Recipe/59873
如果你需要随机产生密码档的输入值,本程式可以依照‘密码长度’、‘是否含有数字’两项条件来输出结果。
计算目录容量大小
http://aspn.activestate.com/ASPN/Cookbook/Python/Recipe/86554
类似
Unix 之 du 工具程式,可用来计算 Windows 系统里目录所占的空间大小,指令选项包括 k、m。动态更改
Python 系统路径http://aspn.activestate.com/ASPN/Cookbook/Python/Recipe/52662
传回值为三类:
-1 新增失败,目录不存在
1 新增成功
0 新增失败,路径已存在